|
|
|
Usuarios conectados
Actualmente hay 5574 visitantes online. |
|
Productos
|
|
Información
|
|
Destacado
|
|
|
 |
|
|
No hay comentarios de productos.
CDX-PD6
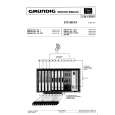
r Operating Procedures for Ejecting a Clamped Disc
1
[F.7] Selects CAMMOTOR Press [TRK�]. Display changes sequentially through 32�33�23�22.
2
Want to eject the currently clamped disc? YES NO
2
Using the [F.7], drive the elevation until the display changes from 22 to 20. [F.8] Selects ELVMOTOR. Using the [TRK�], drive the elevation down until 0.1 is displayed. Using the [TRK+], drive the elevation up until the 10 is displayed (the disc position).
2nd disk 4th disk 6th disk 01�11�10�11�10�11�10�11�10�11�10 1st disk 3rd disk 5th disk
3
[F.7] Selects CAMMOTOR. Using the [TRK+], drive the CAMMOTOR until the 10 is displayed changes from 20 (or 22) to 21 and 31.
4
[F.8] Selects ELVMOTOR. Using the [TRK+], drive the tray of the disc to be ejected up to the top position (Display 10).
5
[F.10] Selects CAM+LOADMOTOR. Using the [TRK+], drive the CAM+LOADMOTOR until the display changes from 32 to 30 and 10. As the elevation is driven into the vicinity of a position where 10 is indicated for the status display, the door will open and part of the disc will be pushed out.
6
[F.9] Selects LOADMOTOR. Press the [TRK+] to eject the disc.
1 Select CAMMOTOR using [F.7], then press the [TRK�] while the disc is being clamped (CAMSW state is 32). The CAMSW status indication sequentially changes through 32�33�23�22. 2 When the disc to be ejected is not identical with the disc being clamped, select the [F.8] ELVMOTOR in the vicinity of where the display changes from 22 to 20, then match the elevation to the disc to be ejected according to the following procedures: After selecting ELVMOTOR, lower the elevation until the ELV position display becomes 01 (1st disc) using the [TRK-]. Drive the elevation up until the display is changed to 10. This is the elevation where the second disk is situated. The next display of 10 tells you the elevation of the 3rd disc. Repeating this operation allows you to establish an elevation matching each disc. (When the elevation is driven from the 1st through 6th disc, the status display changes as 01�11�10�11�10�11�10�11�10�11�10.) (When the disc to be ejected coincides with the disc being clamped, the above operations are not necessary.) 3 Select the [F.7] CAMMOTOR and then, using the [TRK+], drive it until the display changes from 20 (or 22) to 21 and 31. 4 Select the [F.8] ELVMOTOR, then drive the tray of the disc to be ejected up to the EJECT/LOAD position (using the [TRK+]). 5 Select the [F.10] CAM+LOADMOTOR, then drive it in the REV direction until the display changes from 31 to 30 and 10. The door will open immediately before the display changes to 10 and part of the disc will be pushed out. 6 When 10 is displayed, select the [F.9] LOADMOTOR, then drive it in REV direction until the disc is completely ejected.
51
|
|
|
> |
|